If you’re a CentOS user, you know that it’s a stable Linux distribution. But you also know you’re running a fairly old Linux Kernel, since it tries to be as stable as possible. To give you an idea, the latest CentOS 5.5 kernel is version 2.6.18-194 (February 2007), while the latest Linux Kernel is 2.6.37 (January 2011). That’s a difference of nearly 4 years.
While most applications don’t require the very latest kernel, it can be that you require certain features found only in the later kernels (such as TPROXY, for instance).
If you try to build the latest kernel based on your CentOS 5.5 running kernel, it will fail. Because your normal config-file is incompatible with the latest kernel, where you need to explicitly enable certain extra features.
Here’s the rundown on how to get the latest Linux Kernel based on your CentOS 5.5 configuration.
Get your yum packages in order
Do a quick groupinstall of the Development Tools to make sure you have all needed packages.
# yum groupinstall "Development Tools" && yum install ncurses-devel
That should install quite a few binaries, which allow you to build your own kernel. It also includes the ‘ncurses-devel’ package, for the ‘make menuconfig’ to work later on.
Get the latest kernel
Grab the latest copy at the Kernel Archive (stable or longterm, your choice) and unpack it.
# cd /usr/src
# wget "http://www.kernel.org/pub/linux/kernel/v2.6/longterm/v2.6.35/linux-2.6.35.10.tar.bz2"
# bunzip2 linux-2.6.35.10.tar.bz2
# tar xf linux-2.6.35.10.tar
# ln -s linux-2.6.35.10 linux
# cd linux
That should download, unzip (bunzip2), & untar your Linux Kernel. Afterwards, it’ll symlink ‘linux’ to that directory.
Compile the kernel based on your current running CentOS 5.5
First up, grab your current .config file from the kernel and copy it to your /usr/src/linux directory.
# cp /boot/config-`uname -r` /usr/src/linux/.config
This ensures you have all current options enabled (drivers, hardware support, …).
Now to start compiling that latest kernel with this config.
# make menuconfig
This will load a menu where you can configure the new kernel. Go to “Load an alternate Configuration File” and choose the “.config” file you just created earlier. After you’ve loaded it, you might want to change the name for this version via “General Setup” > “Local version".
Press ESC a few types to go back to the main menu, and hit ESC again to exit. When asked to confirm you want to save, choose “yes” of course.
Now start compiling your kernel and create an RPM package for it, by running the make rpm command.
# make rpm
Wait a while (depending on your hardware, either 20 minutes or 4 hours) for the RPM to be created. Make sure you have enough free disk space to let the building go.
Install kernel & create the initrd system for your custom kernel
Now you have your RPM package, install it.
# rpm -ivh /usr/src/redhat/RPMS/i386/kernel-2.6.35.10local0-1.i386.rpm
The command above will probably be different on your system. Replace the i386 with your architecture, and the *.rpm filename with the actual one.
Now find your new kernel name. This will depend on the name you gave it in the ‘make menuconfig’ General Setup menu. It’ll probably be the only one with a recent kernel version.
# rpm -qa | grep -i kernel
kernel-2.6.18-194.32.1.el5
kernel-2.6.18-53.el5
kernel-devel-2.6.18-194.32.1.el5
kernel-headers-2.6.18-194.32.1.el5
kernel-2.6.18-164.15.1.el5
kernel-2.6.35.10local0-1
Now build your initrd image.
# mkinitrd /boot/initrd-2.6.35.10-local0.img 2.6.35.10-local0
And edit your /boot/grub/menu.lst file to add this new kernel.
# vim /boot/grub/menu.lst
Copy the last 4 lines and modify them for your new kernel & initrd names. Now reboot.
Fixing the ‘switchroot: mount failed’ problem on new kernels
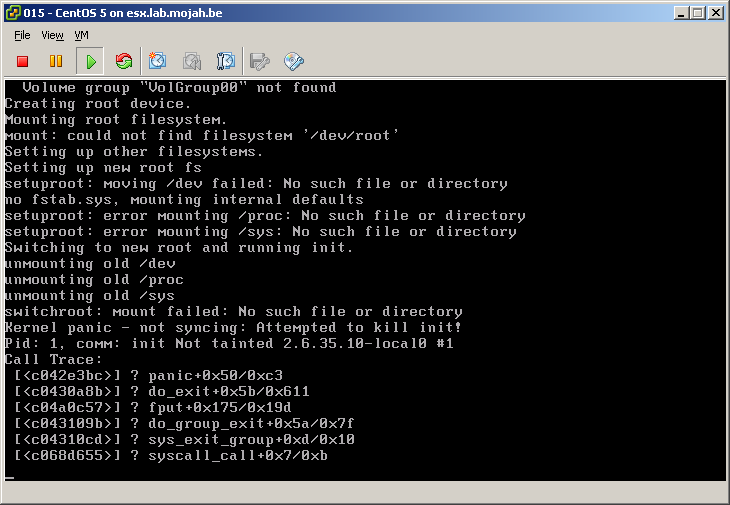
The problem you’ll probably encounter now, is as decribed in the screenshot below.
Creating root device.
Mounting root filesystem.
 Mount: could not find filesystem '/dev/root'
Setting up other filesystems.
Setting up new root fs
setuproot: moving /dev failed: No such file or directory
no fstab.sys, mounting internal defaults
setuproot: error mounting /proc: No such file or directory
setuproot: error mounting /sys: No such file or directory
Switching to new root and running it
unmounting old /dev
unmounting old /proc
unmounting old /sys
switchroot: mount failed: No such file or directory
 Kernel panic - not syncing: Attempted to kill init!
Call trace:
[snip]
Even though everything you did was correct, this error pops up. Why? Because there’s a simple setting that needs to be set in the new .config files, that was not present in the old ones.
So let’s fix it. Go back to your source directory and run make menuconfig.
# cd /usr/src/linux
# make clean && make mrproper
# cp /boot/config-`uname -r` /usr/src/linux/.config
# make menuconfig
> load the '.config' configuration file
> change the 'Local Version' name in 'General Setup'
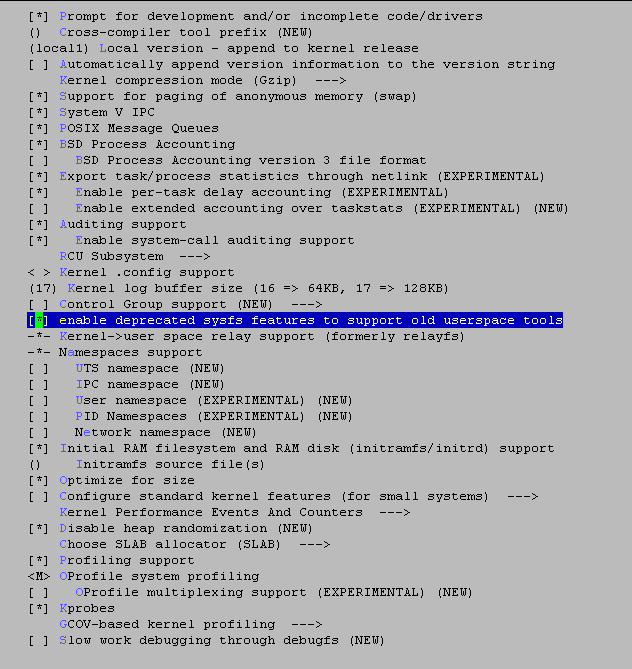
> check the 'enable deprecated sysfs features to support old userspace tools' in 'General Setup'
The setting which fixes it all, is highlighted in the screenshot below.
Now save your config, run make rpm again, install the binaries as described above and be very happy that you now have a running kernel!
This fix was found after too much troubleshooting via the CentOS forum.

