Introduction#
Some of members of the cloud-native computing world have recently been trying to find a way to address the areas where Kubernetes falls short when trying to run on resource constrained environments.
The result is a Kubernetes distribution, that has quickly been gaining popularity in the community as a Compact and Edge-Focused Linux Distribution that cuts the fat away from traditional k8s.
Currently, k3s is the second most popular Kubernetes distribution on the CNCF Cloud Native Landscape after Rancher .
This popularity has resulted in a lot of growth for the project, and I am very excited to see where it ends up. Today I’m going to be introducing you to a light-weight utility called k3sup (Pronounced “ketchup”), created by Alex Ellis , that is going to help you get k3s spun up on your infrastructure.
What is k3sup?#
Although installing k3s can be pretty simple and you could easily spin up a thing like this with bash, however, k3s was developed to automate what can be a very manual and confusing process for many developers, who are already short on time.
Once you’ve provisioned a VM with your favourite tooling, k3sup means you are only 60 seconds away from running kubectl get pods on your own computer. With version 0.2.0, you can even join other nodes into any existing k3s cluster.
Use cases, as explained in the README :
- Bootstrap Kubernetes with k3s onto any VM - either manually, during CI or through
cloudinit - Get from zero to
kubectlwithk3son Raspberry Pi (RPi), VMs, AWS EC2, Packet bare-metal, DigitalOcean, Civo, Scaleway, and others - Fetch a working KUBECONFIG from an existing
k3scluster - Join nodes into an existing
k3scluster withk3sup join
Installing k3sup#
k3sup is distributed as a static Go binary. You can use the installer on MacOS and Linux, or visit the Releases page
to download the executable for Windows.
You’ll find these detailed install instructions in the k3sup README-file too.
$ curl -sLS https://get.k3sup.dev | sh
$ sudo install k3sup /usr/local/bin/

$ k3sup --help
A note for Windows users: you can use k3sup install and k3sup join with the normal “Windows command prompt”.
Usage#
The k3sup tool is designed to be run on your desktop/laptop computer, but binaries are provided for MacOS, Windows, and Linux (including ARM).
Setup a Kubernetes server with k3sup#
You can setup a server and stop here, or go on to use the join command to add some “agents” aka nodes or workers into the cluster to expand its compute capacity.
Provision a new VM running a compatible operating system such as Ubuntu, Debian, Raspbian, or something else. Make sure that you opt-in to copy your registered SSH keys over to the new VM or host automatically.
Note: You can copy ssh keys to a remote VM with ssh-copy-id user@IP.
Imagine the IP was 192.168.0.1 and the username was ubuntu, then you would run this:
Run k3sup:
$ export IP=192.168.0.1
$ k3sup install --ip $IP --user ubuntu
Now try the access:
$ export KUBECONFIG=`pwd`/kubeconfig
$ kubectl get node
Join some agents to your Kubernetes server#
Let’s say that you have a server, and have already run the following:
$ export SERVER_IP=192.168.0.100
$ export USER=root

$ k3sup install --ip $SERVER_IP --user $USER
Next, join one or more agents to the cluster:
$ export AGENT_IP=192.168.0.101

$ export SERVER_IP=192.168.0.100
$ export USER=root

$ k3sup join --ip $AGENT_IP --server-ip $SERVER_IP --user $USER
That’s all, so with the above command you can have a two-node cluster up and running, whether that’s using VMs on-premises, using Raspberry Pis, 64-bit ARM or even cloud VMs on EC2.
Create a multi-master (HA) setup#
As of k3s 1.0, a HA multi-master configuration is available through an embedded datastore. (It launched on dqlite; k3s later swapped that out for embedded etcd in v1.19.1, which is what you’ll get today. Plain sqlite is single-node only and can’t back a multi-server cluster.) A quorum of masters will be required, which means having an odd number of nodes, at least three.
Initialize the cluster with the first server#
Note the --cluster flag:
$ export SERVER_IP=192.168.0.100
$ export USER=root

$ k3sup install \
    --ip $SERVER_IP \
    --user $USER \
    --cluster
Join each additional server#
Note the new --server flag:
$ export USER=root
$ export SERVER_IP=192.168.0.100
$ export NEXT_SERVER_IP=192.168.0.101

$ k3sup join \
    --ip $NEXT_SERVER_IP \
    --user $USER \
    --server-user $USER \
    --server-ip $SERVER_IP \
    --server
Now check kubectl get node:
$ kubectl get node
NAME              STATUS   ROLES    AGE     VERSION
paprika-gregory   Ready    master   8m27s   v1.16.3-k3s.2
cave-sensor       Ready    master   27m     v1.16.3-k3s.2
Micro-tutorial for Raspberry Pi (2, 3, or 4)#
In a few moments you will have Kubernetes up and running on your Raspberry Pi 2, 3 or 4. Stand by for the fastest possible install. At the end, you will have a KUBECONFIG file on your local computer that you can use to access your cluster remotely.
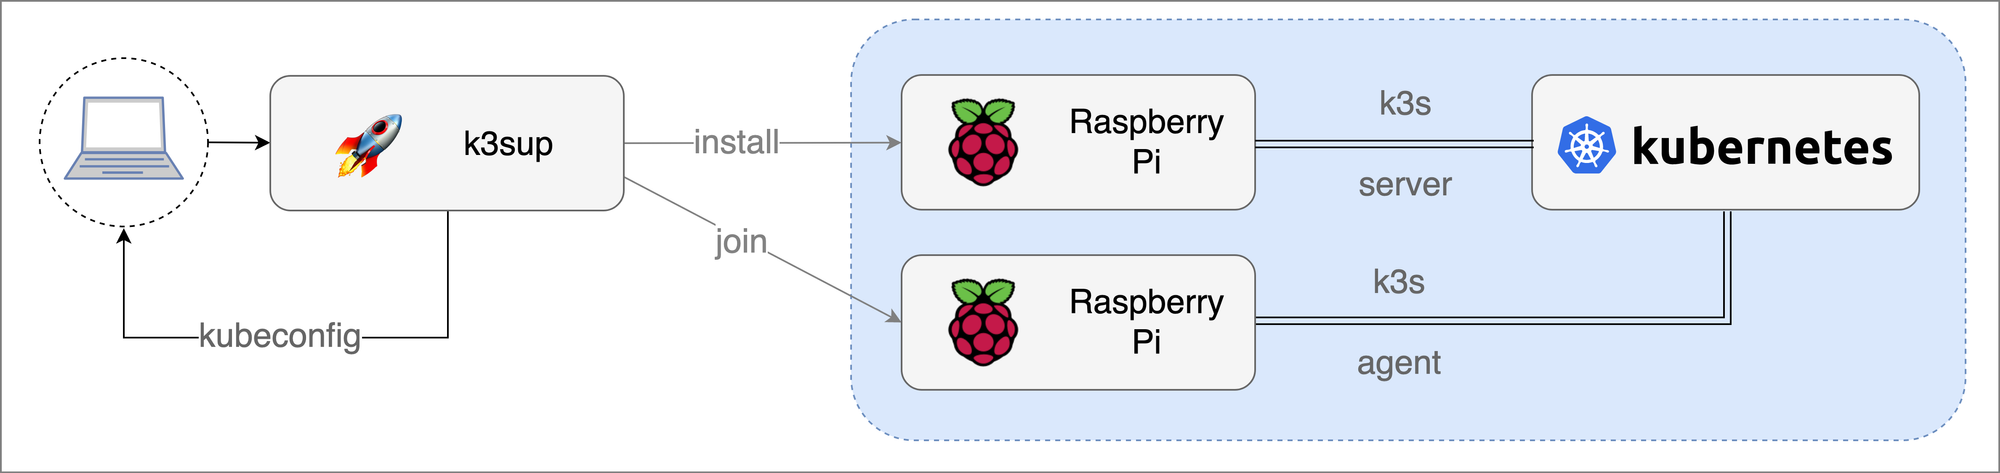
Image source: k3sup README .
First:
- Download etcher.io for your OS
- Flash an SD card using Raspberry Pi OS Lite
- Enable SSH by creating an empty file named
sshin the boot partition - Generate an ssh-key if you don’t already have one with
ssh-keygen(hit enter to all questions) - Find the RPi IP with
ping -c raspberrypi.local, then setexport SERVER_IP=""with the IP - Copy over your ssh key with:
ssh-copy-id [email protected] - Run
k3sup install --ip $SERVER_IP --user pi - Point at the config file and get the status of the node:
$ export KUBECONFIG=`pwd`/kubeconfig
$ kubectl get node -o wide
You now have kubectl access from your laptop to your Raspberry Pi running k3s.
If you want to join some nodes, run export IP="" for each additional RPi, followed by:
$ k3sup join --ip $IP --server-ip $SERVER_IP --user pi
Next steps#
Now where next? Well it’s really up to you. This is a fast growing project and more material is coming out every day.
You could possibly try seeing what flags and configurations you can incorporate into your clusters to demo the tool or even try contributing on the Github repo.